 |
Start with a new RGB image (300x300 pixels) and fill it with black Go to filter/other/offset and apply the settings as the picture shows here to the left. |
 |
Select the black square with the MagicWand Tool and use the MoveTool while holding down the shift key to drag it to the upper left corner. |
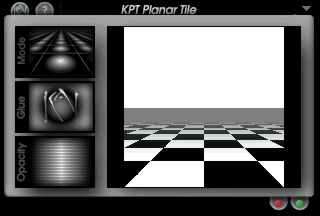 |
Now, use the Planar Tiling filter from Kai´s Power tools. You can see the settings on the picture here to the left. |
 |
Add a new layer and select the gradient tool with the settings: Foreground to transparent. Use white as foregroundcolor. Drag it from above the "horizon" to the bottom of the image. Do that 2 or 3 times. |
 |
Add a new layer and write your text. Fill it with desired color and apply some effects. Don´t deselect the the text. |
 |
Apply the PerspectiveShadow from EyeCandy. Copy the text and paste it. A new layer will be added. |
 |
Go to Layer/transform/flip horizontal and set the layer opacity to about 45-50%. Move the text to the baseline of the originally text. |